Ever seen a solid table last through decades of daily abuse? The real secret is not fancy screws or modern fasteners. True strength comes down to well-made woodworking joints. Wood expands with summer humidity and shrinks in winter dryness. Because of this movement, your pieces need smart mechanical connections. Choosing the right connection keeps your projects sturdy for life.
When you cut into timber, you quickly notice how grain direction dictates strength. Gluing boards side by side creates bonds stronger than natural fibers. But gluing raw end grain directly to another surface fails easily. Understanding basic grain behavior saves you endless shop frustration.
Let us dig straight into the core techniques that define lasting furniture.
The Secret Mechanics Behind Durable Woodworking Joints
Wood acts like a tight bundle of tiny drinking straws. It drinks up airborne moisture through open end pores. It swells across its width while staying stable along its length. If you ignore cross-grain changes, wide tabletops will split open. Great furniture makers design around this seasonal rhythm every day. For a solid grasp of fundamental assemblies, explore these 7 types of wood joints every beginner should know to build confidence early.
Smart woodworkers align grain carefully and test each mating surface. Liquid glue sinks into microscopic pores and locks fibers together permanently. A clean mechanical interlock prevents joint faces from twisting loose over time. With solid prep, simple assemblies easily withstand severe daily stress.
Selecting Proper Timber and Reading Grain
Dense hardwood like oak, cherry, or walnut cuts cleanly under edge tools. Hard fibers support fine detail without crushing under direct hand pressure. Soft timbers compress quickly, making crisp interior corners trickier to shape cleanly. Selecting quality stock prevents tears along your cut lines.
End grain never holds adhesive well because open pores soak it away. Face grain to edge grain creates a far stronger long-term surface bond. Aligning fibers properly prevents sudden glue line failures later on. Good grain orientation keeps every single project square and tight.
Essential Hand Tools for Crisp Layout and Cutting
Power tools rough out shapes, but hand tools deliver perfect final fits. A razor-sharp chisel pares down wood fibers with total control. Dull tools crush grain, ruin layout lines, and cause slips. Keep your sharpening stones nearby and hone edges regularly during work.
Pick up a marking knife, a wheel gauge, and a solid saw. Knife lines sever surface fibers and guide saw teeth straight. Steel rules give repeatable measurements across all matching pieces. Clean cuts start with accurate lines and very sharp steel.
The Butt Joint: Basic Shop Setups and Dowels
The butt joint joins the squared end of one board to another face. It looks very simple, but relying on bare end-grain adhesive alone fails. Wood end pores drink adhesive like water, leaving dry, brittle seams. Without internal reinforcement, slight bumps can easily crack this connection apart. To elevate your skills, check out crafting beautiful joinery techniques and tools for deeper guidance on tool setups.
Still, cutting accurate butt joints trains your eye on basic machine setups. Producing flat faces and true ninety-degree edges takes patient discipline. Once boards sit dead flush, adding internal pegs creates remarkable joint strength.
Reinforcing Square Boards with a Sturdy Hardwood Dowel
Drilling matching holes and tapping in a hardwood dowel reinforces weak seams. The fluted pin bridges the seam with strong, continuous grain across the gap. It resists shear forces that snap unreinforced butt joints.
- Mark your centerlines using an accurate drill guide jig.
- Choose spiral fluted pins so trapped air and adhesive escape.
- Bevel the pin ends slightly to ease insertion during final clamping.
Because alignment stays straightforward, these are the best woodworking joints for beginners. They build solid frames and small cabinets without costly machinery.
Pocket Screws: Quick Assembly for Utility Frames
Pocket hole joinery relies on steep angled pilot holes drilled into board faces. Specialized self-tapping screws pull both parts together under immense mechanical tension. The internal screw acts as a built-in clamp during glue cure.
Cabinet shops use pocket joinery to mount face frames quickly and cleanly. They hide angled screw holes inside cabinet carcasses away from sight. This modern method speeds up utility builds while keeping parts tight.
Choosing Screws for Reliable Frame Fastening
Never use brittle drywall screws that snap under hard driving torque. Specialized pocket screws feature washer heads that seat flat inside holes. The self-tapping auger tip clears wood chips without splitting dry grain.
Use fine-threaded screws for dense walnut, oak, or hard maple boards. Switch to coarse-threaded screws for soft pine or layered cabinet plywood. Selecting correct screw threads guarantees maximum bite inside delicate pilot holes.
The Half-Lap Joint: Strong Interlocking Connections
A half-lap removes half the thickness from each intersecting board. The two pieces nest together flush, creating a flat joint surface. It yields large face-grain contact areas where long fibers bond securely.
This classic joint handles racking stress far better than simple butt connections. You see it in Japanese screens, picture frames, and timber structures. Built-in shoulders naturally keep frames square during tricky clamp glue-ups.
Cutting Clean Lap Cheeks with Handsaws or Machinery
Consistent cutting depth on both matching workpieces is absolutely vital here. If one cheek sits too deep, surfaces will never lay flush.
- Knife both shoulder lines across the workpieces at the exact same time.
- Set saw depth to half the total thickness of your wood.
- Remove waste using spaced kerf cuts across the joint area.
- Pare away remaining ridges with a wide, flat hand tool.
Test the fit by pressing the boards together by hand. If parts bind, scrape high spots until both faces sit flat.
The Mortise and Tenon: The Core of Fine Furniture
Historic tables owe their incredible longevity to the mortise and tenon. A projecting tongue slots directly into an enclosed female socket cavity. This internal union provides massive glue area and resists heavy structural twisting.
It remains the gold standard for table aprons, stools, and cabinet doors. The joint hides entirely inside the timber, keeping outside grain surfaces clean. Learning traditional joinery techniques for furniture starts with this classic structural connection.
Layout Proportions for Strong Structural Tenons
A tenon cut too thin snaps easily under heavy bending weight. Cut it too thick, and thin mortise walls split wide open. Balancing these dimensions keeps both joint halves equally strong under load.
Make tenon thickness roughly one-third of the total board thickness. Center the mortise cleanly on the leg to keep walls balanced. Chop waste out gradually using controlled mallet strikes on your tool.
The Bridle Joint: High Strength for Corner Framing
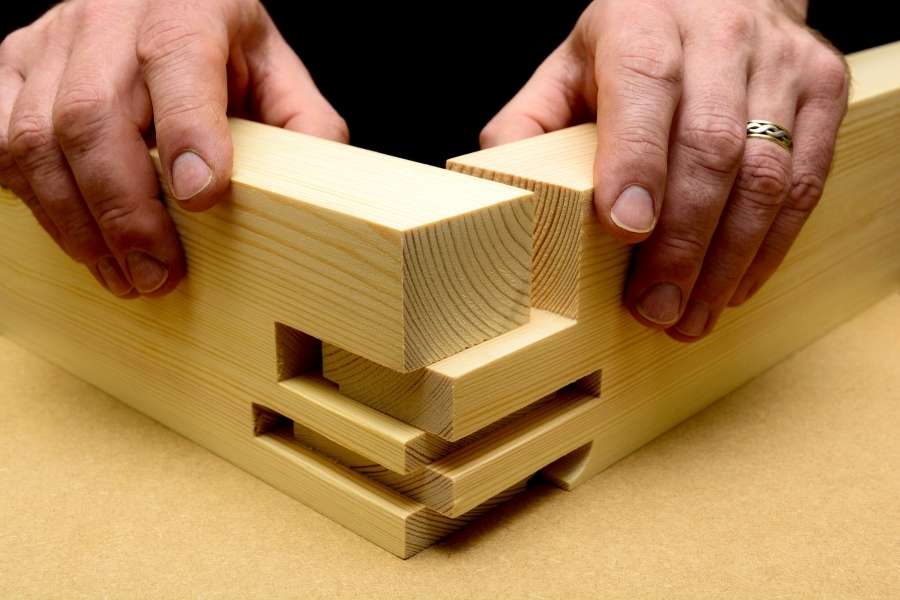
The bridle joint functions like an open-ended version of a tenon. A deep open slot cuts through one board to accept a center tenon. Three interlocking fingers create vast gluing area for maximum corner strength.
Makers choose bridle joints for workbench legs, mirror frames, and angled chairs. Its exposed lines showcase your sawing accuracy around the entire joint. The open shape lets you inspect the internal fit before adding adhesive.
Sawing and Fitting Open Bridle Faces
Cutting open joints demands sawing straight down along knife lines without wandering. Any blade drift twists your finished frame out of true flat alignment.
- Clamp your board vertically and angle the top edge toward you.
- Saw down the cheek lines, staying strictly on the waste side.
- Clear central waste using a coping saw or narrow edge tool.
- Slide the parts together using firm, even hand pressure alone.
Never force parts together using heavy, aggressive blows from a mallet. Overly tight tenons act like wedges and split thin side walls.
The Splined Miter: Clean Corners with Hidden Power
A forty-five-degree miter hides unsightly end grain inside decorative box corners. The angled cut creates an unbroken ribbon of natural grain around borders. Yet bare miter joints hold poorly because end grain absorbs adhesive rapidly.
Cutting a perpendicular slot across the corner solves this structural weakness completely. Slipping a wooden spline across the joint bridges weak end grain effectively. The spline adds long-grain glue area and turns corners into sturdy assemblies.
Aligning Spline Slots for Beautiful Contrast
Contrasting spline species turn basic corner joints into stunning visual highlights. Dark walnut keys inside pale maple boxes catch the eye immediately.
- Glue the mitered box corners using low-stretch masking tape wraps.
- Build an angled cradle jig that holds boxes securely over your blade.
- Cut slots across the corner apex at evenly spaced decorative intervals.
- Mill splines with grain running across the joint seam for strength.
- Glue the splines into slots and trim them flush once dry.
Splines prevent corners from opening up during dry winter heating seasons. They turn fragile display boxes into heirloom items built to endure.
The Dovetail: The Timeless Signature of Quality
No connection earns more respect in woodworking than the classic dovetail. Flaring pins and wedge-shaped tails create an unbreakable mechanical lock across corners. Even if adhesive fails completely, the angled pins physically cannot pull straight out.
Cabinetmakers historically used them for drawers that endure decades of heavy pulling. Today, craftspeople celebrate exposed dovetail pins as proof of hand-tool mastery. Alternating end grain and long grain forms a gorgeous visual rhythm.
Deciding Between Tails First and Pins First
Woodworkers love debating whether to saw tails first or pins first. Both methods work well if you transfer layout lines with absolute care.
- Sawing tails first lets you trace profiles directly onto pin ends.
- Sawing pins first provides wide reference edges for knife tracing lines.
- Always cut inside waste wood to leave your layout line intact.
Learning how to cut strong woodworking joints by hand demands patience. Slow down, saw plumb, and pare cautiously to your knife line.
Precision Cuts: Step by Step Guide to Dovetail Joints
Follow this proven step by step guide to dovetail joints for crisp corners.
- Stock PreparationSquare all boards dead true so layout marks stay accurate across corners.
- Scribing the BaselineSet a marking gauge slightly thicker than the mating timber and scribe lines.
- Laying Out Tail AnglesMark tail slopes using a sturdy marker set to a clean 1:8 angle.
- Sawing the TailsSaw down the waste side of lines right to your scribed baseline.
- Removing Tail WasteSaw out inner waste with a coping saw and pare baselines flat.
- Transferring to the Pin BoardRest the tail board on the pin end and trace profiles with a knife.
- Sawing and Fitting PinsSaw pin cheeks inside waste and pare gently until components slide together cleanly.
Careful layout guarantees gap-free corners that look incredible on finished drawers.
Essential Shop Advice for Clamping and Glue-Up Success
A stressful glue-up can easily ruin days of precise joint cutting. Wet adhesive acts like a slick lubricant that shifts square parts unexpectedly. Planning your glue-up steps turns panic into a smooth, quiet process.
Always run a dry assembly without adhesive using all your clamps ready. Check frames for squareness by measuring opposite diagonals with a steel tape.
Selecting the Right Workshop Adhesives
Different adhesive formulas give you different assembly times for complex assemblies. Standard polyvinyl acetate sets rapidly within minutes for quick project builds. Type II adhesive provides reliable moisture resistance for common indoor furniture pieces. Waterproof Type III formulas protect outdoor picnic tables and garden patio benches. Liquid hide glue offers extended open assembly time for intricate cabinets. Polyurethane adhesive cures solidly across varied materials and exterior wooden gates.
Spread thin, even coats of adhesive across all mating long-grain surfaces. Excessive squeeze-out drips across wood and ruins your final finishing stains.
Applying Proper Pressure Across Joint Lines
Careful clamping pulls joint shoulders closed without bending or bowing delicate frames. Over-tightening steel clamps starves joints of adhesive and crushes surface wood fibers.
Place clamp bars directly over joints so pressure vectors pull completely straight. Use scrap wood cauls between clamp jaws and parts to prevent denting.
Frequently Asked Questions
What are the best woodworking joints for beginners?
Dowel joints, pocket screws, and half-laps are great starting options for newcomers. They teach core basics like squaring stock and cutting clean shoulders accurately.
Why did my timber joint split apart during glue assembly?
Parts split when tenons are too thick or trapped glue creates hydraulic pressure. Always provide tiny exit grooves so excess adhesive and air escape freely.
How tight should my joint fit before applying any adhesive?
Joints should slide together snugly under firm, steady hand pressure without binding. If parts need heavy mallet blows, pare faces down slightly for glue room.